Super Video Golf
Creating Your Own Courses: Part 2
Note that this is a repost of the guide found on the wiki, here. Part one of this guide can be found here.
This guide follows on directly from part 1 and assumes those steps have been completed.
Overview
This part of the guide covers
- Sculpting the landscape. This optional step allows crafting the rolling terrain which appears around the edge of the hole.
- Baking the terrain texture. This texture (described in the
course_format.mddocument in the mod kit) is used to place in-game generated vegetation, and describes the height map for the surrounding landscape. - Placing game data. Each hole needs to have data describing the tee and pin positions, as well as optionally any prop models placed for decoration.
- Exporting the data from Blender and importing it into the game.
Sculpting the Landscape
As an optional step it is possible to create a heightmap, used to define the landscape around the hole geometry. If you’re using the Blender template file this has already been set up as a sub-divided plane named scrub template. It has a special material assigned to it for baking the heightmap once it has been sculpted. To shape the terrain select the scrub template object and switch Blender to sculpt mode. If the hole geometry and water plane are visible it is then easy to get visual feedback on how the sculpted terrain will appear relative to the rest of the world. Using Blender’s sculpt tools you can manipulate the terrain to your desire.
Baking the Terrain Texture
Each hole requires a terrain texture which describes some properties to the VGA Golf game engine. The texture is a 320x200px RGBA image, with terrain type information stored in the red channel and optional heightmap stored in the green channel. Although the blue and alpha channels are not used the game requires the image be in RGBA format, else it will not load.
To create the data for the red and green channels the hole template file has materials specially prepared for baking in Blender. If you used these then you’re already set for baking. If not then the easiest course would be to go to file->append then browse to the template file, open the materials folder and append the terrain materials (green, bunker, rough etc) as well as the height material to your project. Apply the terrain materials to the relevant parts of the hole model, and apply the height material to the sculpted terrain mesh, if it has been created.
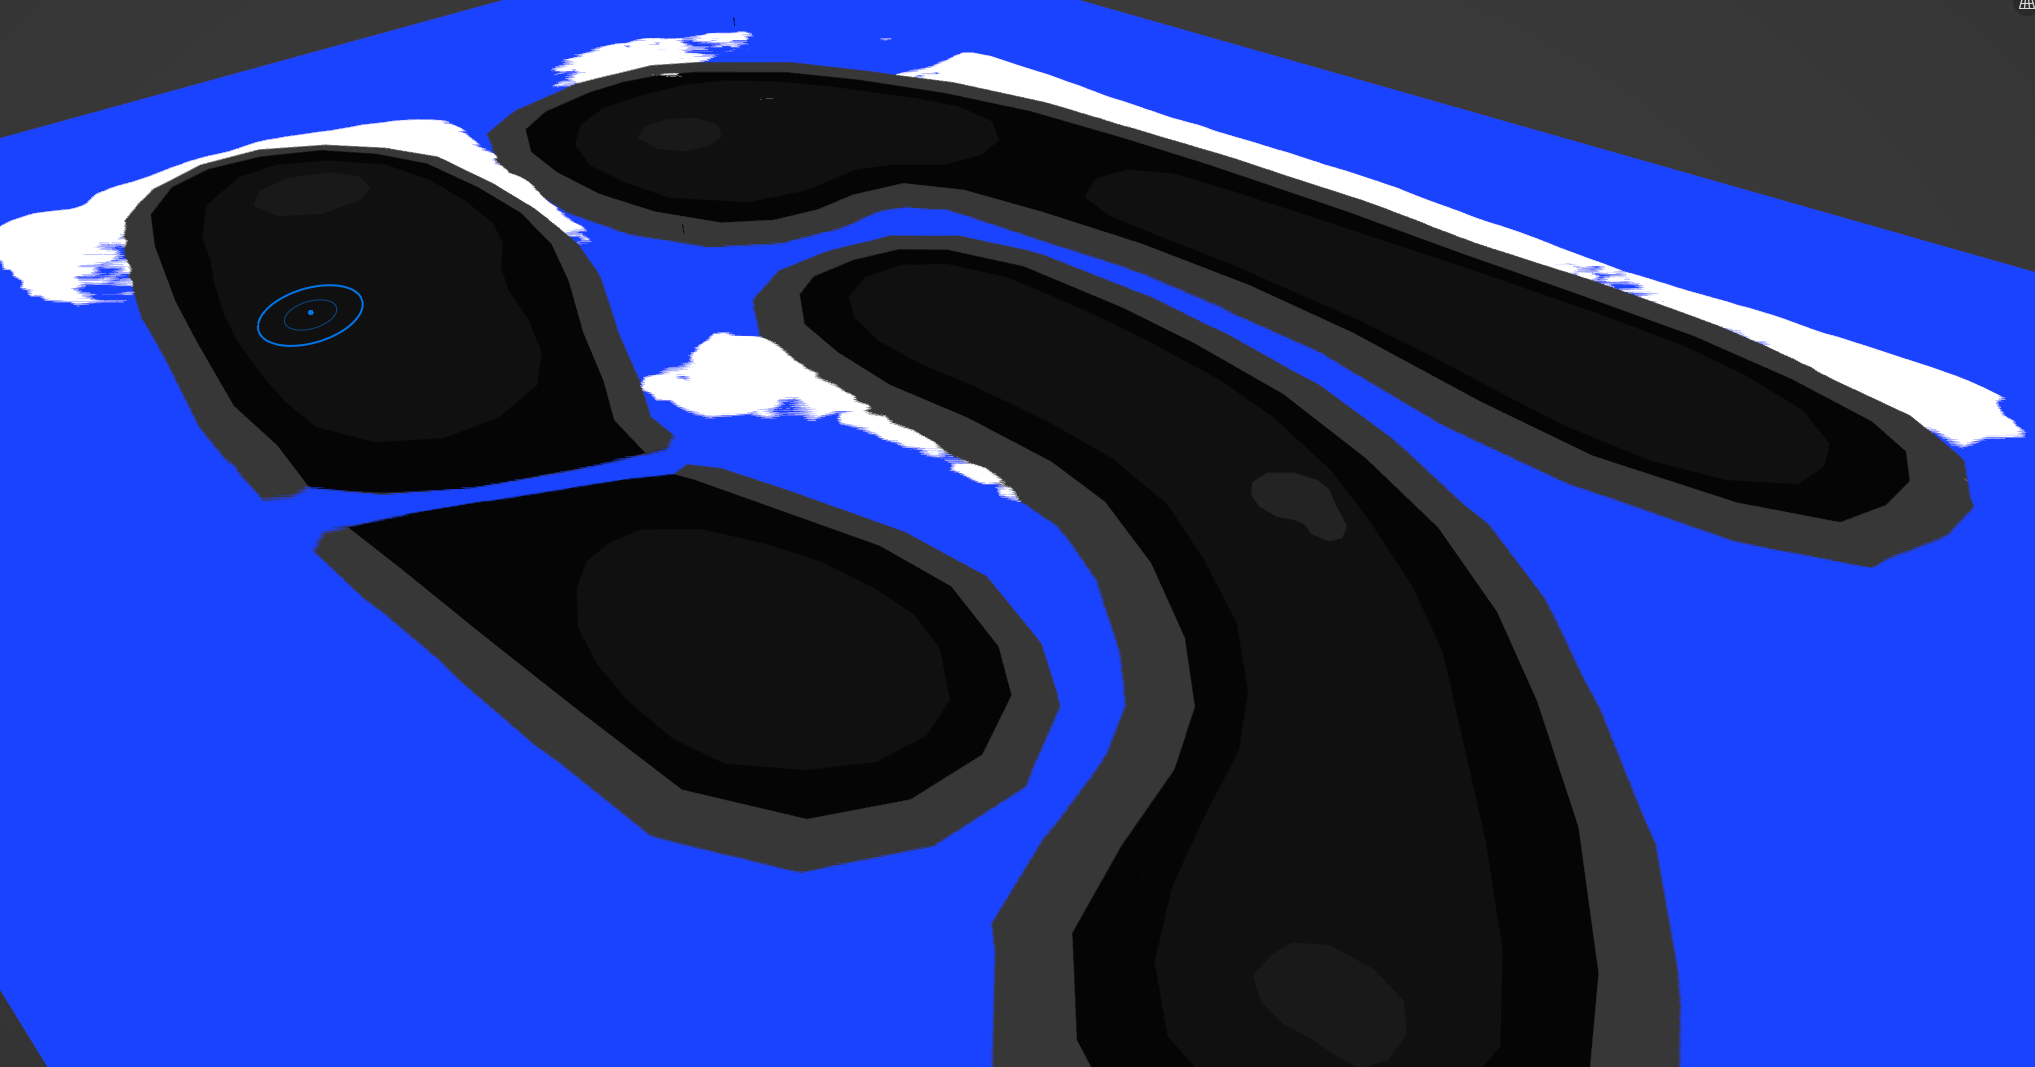
To first bake the red-channel data, switch to Blender’s shading workspace. Make sure the hole model is visible and, if using the template file, the water_grey object is visible. This object makes sure that when baking the texture the ‘empty’ areas are filled with the correct grey tone for water collision. If you’re not using this then you will need to edit the image file afterwards to correct the colour. First click the hole model in the layer view window before ctrl+clicking the water_grey object and finally the bake plane. It’s important that the bake plane is selected last as it will be the target for the baking process.
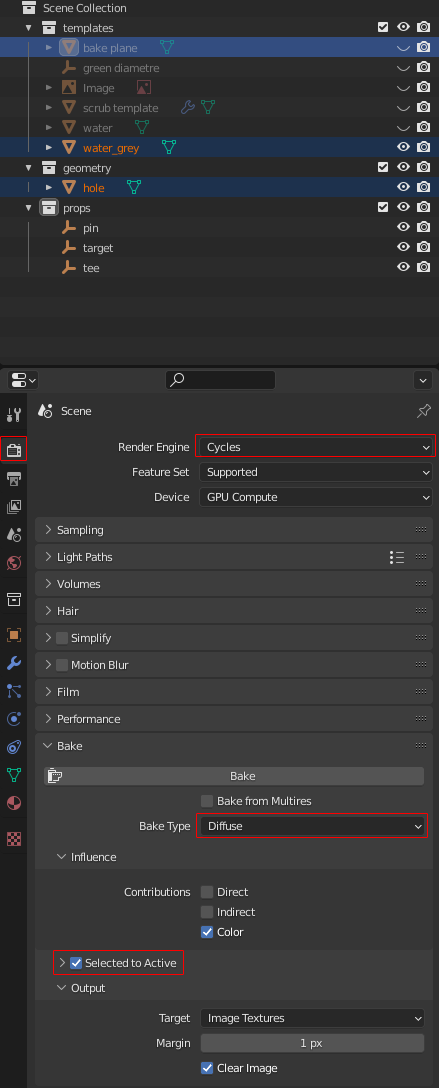
In the render settings make sure to have Cycles set as the renderer and that Selected to Active is checked, as this means all selected objects will be baked down to the active bake plane. The materials for the terrain have been set so that the vertex colour will be ouput to the surface of the material. Click Bake and a greyscale image will be output to Image window. If you can’t see this make sure that the ‘bake’ texture is selected for preview. Save the image to a file with a name like ‘red_channel_output.png’ or similar.
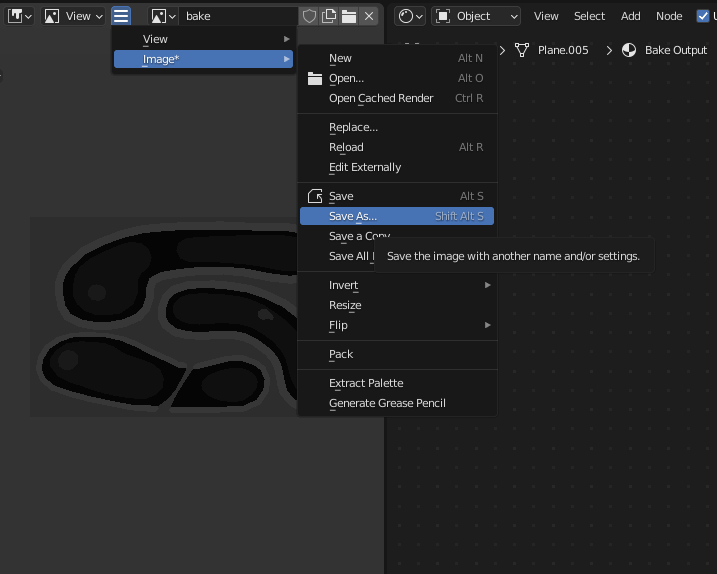
If you also have a landscape sculpted with a height material applied you can repeat the above steps by first clicking the sculpted terrain, ctrl+clicking the bake plane and then clicking Bake. The heightmap material is configured to use vertex position data to create a height map texture. The texture output will probably look a bit like a cloud. Save this as an image named green_channel or similar.

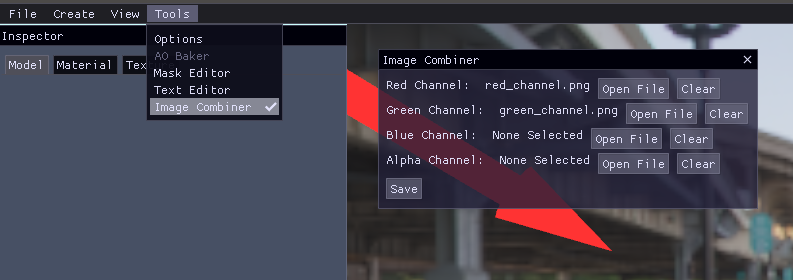
Once you have one or both of the images, they need to be converted so that they are applied to the correct channels of a single image. This can be done using the same Editor software with which the model file was converted. Launch the Editor then go to tools->image combiner. In the new window which opens select the red and (optionally) green image files as appropriate. Then click Save to output the the combined image to assets/golf/courses/my_course/my_hole.png. This will make sure the ‘red’ image is written only to the red channel and ‘green’ image is written only to the green channel.
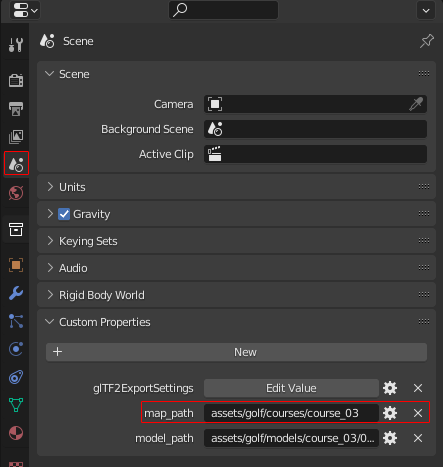
When this is done update the Blender file with the output path of the image. This is done so that when exporting the hole data Blender knows where to find the image you have just created. On the Scene tab click add custom property, set the property type to String and the name to map_path. Set the value of the property to the directory in which the image is stored - don’t include the file name itself.
Placing Game Data
Every hole in VGA Golf needs to know where the tee and the pin are positioned. It also uses a target position, to orientate the player towards when they first tee off. These are placed in Blender as Empty types, usually displayed as an arrow. These must be named tee, pin and target respectively so that they are correctly exported to the hole configuration file. The hole template file in the mod kit already includes these objects, so if you aren’t building on the template file then they can be appended to your project by going to file->append and browsing the objects in the hole template Blender file.
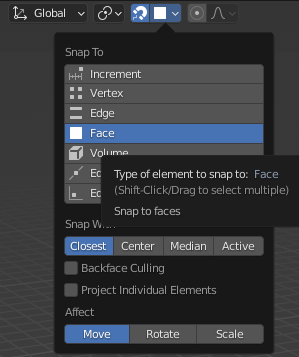
Simply place these objects in Object mode in Blender where they should appear in the game. It is important to make sure that they are placed exactly on the surface of the hole model, so make sure this happens by enabling snapping, and setting the snap mode to face.
With these placed you are ready to export the hole data, assuming you installed the export add-on as described in the Setting Up part of the guide.
Exporting to the Game
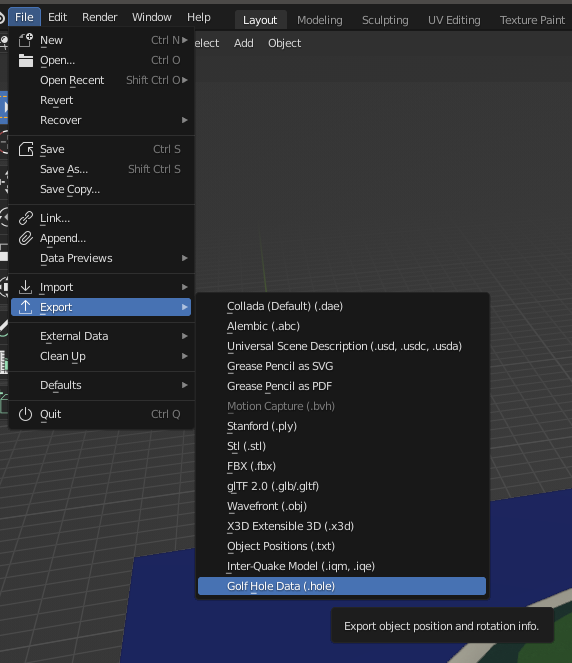
To export the game data to a configuration file which can be read by VGA Golf, make sure to select the the Empty objects named tee, pin and target. Go to file->export->golf hole data. Browse to the directory where you saved the image for the terrain texture, and save the file as my_hole.hole (ie the same name as the image file but with the *.hole extension).
When the file has saved, open it in a text editor to check that the paths contained are correct. It should look something like this:
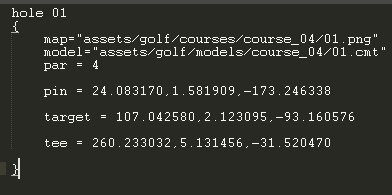
If the file paths say something like set_me then the custom properties outlined in Converting the Model and Baking The Terrain Texture have not been set. You can also take this opportunity to set the PAR for the hole. A good value is usually the minimum number of strokes it takes to get to the green + 2. This will probably require some play testing, but you can come back and edit the *.hole file as often as necessary.
With the hole complete, repeat the process as many times as needed. Because the configuration file allows specifiying a hole model it’s entirely possible to create multiple holes with the same model, only placing the tee and pin in different positions. See the included course_03 holes as an example - only two models are required for all 18 holes.
To load the course in to the game a final configuration file needs to be created in the course directory, with the name course.data. This file describes a ‘play list’ of holes, allowing multiple hole files to be reused in multiple courses. As an example course_03 is also split into the front nine holes course_03a and back nine holes course_03b by simply listing only the front or back nine holes in the configuration file. The configuration file is a text file and can be created in your favourite text editor, as follows:
course course_03
{
    skybox = "assets/golf/images/skybox/spring/sky.ccm"
    billboard_model = "assets/golf/models/shrubbery.cmt"
    billboard_sprites = "assets/golf/sprites/shrubbery.spt"
    audio = "assets/golf/sound/ambience.xas"

    title = "Old Stemmer's Lane Pitch 'n' Putt"
    description = "The Putter's Choice"

    hole = "assets/golf/courses/course_03/01.hole"
    hole = "assets/golf/courses/course_03/02.hole"
    hole = "assets/golf/courses/course_03/03.hole"
    hole = "assets/golf/courses/course_03/04.hole"
    hole = "assets/golf/courses/course_03/05.hole"
    hole = "assets/golf/courses/course_03/06.hole"
    hole = "assets/golf/courses/course_03/07.hole"
    hole = "assets/golf/courses/course_03/08.hole"
    hole = "assets/golf/courses/course_03/09.hole"
    hole = "assets/golf/courses/course_03/10.hole"
    hole = "assets/golf/courses/course_03/11.hole"
    hole = "assets/golf/courses/course_03/12.hole"
    hole = "assets/golf/courses/course_03/13.hole"
    hole = "assets/golf/courses/course_03/14.hole"
    hole = "assets/golf/courses/course_03/15.hole"
    hole = "assets/golf/courses/course_03/16.hole"
    hole = "assets/golf/courses/course_03/17.hole"
    hole = "assets/golf/courses/course_03/18.hole"
}
For a full explanation of the properties see the course_format.md file in the mod kit directory. When the game loads it will automatically search and try to parse any course.data files it finds. If there is an error parsing a file it is usually printed to the in-game console which can be opened by pressing F1. Successfully parsed configuration files will the appear as courses selectable when hosting a new game.
Leave a comment
Log in with itch.io to leave a comment.