Super Video Golf
Creating Your Own Courses: Part 1
Please note that this is a reproduction of the wiki page, here.
Creating a custom golf course may at first appear daunting, but is in fact reasonably easy to understand once the process is broken down into stages. This guide will attempt to describe those stages to aid in what is hopefully a fun and rewarding experience creating custom content for VGA Golf. The only software required is Blender (although other 3D software will work), and the current version of the mod kit, available in the repository or on itch.io. Note that this will not work on bundled app versions of VGA Golf on macOS. You'll need to compile the game from source in order that you can work directly on the file system. Once the course has been created it can be bundled with existing assets in the app bundle. This does not affect Windows or Linux versions.
Overview
A course is made up of one or more holes, and is described to the game through a configuration file. The configuration file is detailed later in this guide, and also has its own document describing the format in the mod kit directory, named `course_format.md`. Making a hole for a course is composed of several steps.
- Creating the geometry. That is, the 3D mesh that makes up the terrain seen in the game.
- Masking the geometry with collision data. This controls how the ball will interact with different parts of the hole.
- Assigning materials to the geometry. Each different terrain type requires its own material, that not only defines how it appears in game, but how the game engine assigns the collision mask.
- Sculpting the landscape. This optional step allows crafting the rolling terrain which appears around the edge of the hole.
- Baking the terrain texture. This texture (described in the `course_format.md` document in the mod kit) is used to place in-game generated vegetation, and describes the height map for the surrounding landscape.
- Placing game data. Each hole needs to have data describing the tee and pin positions, as well as optionally any prop models placed for decoration.
- Exporting and converting the data from Blender and importing it into the game. This is handled by the software included in the mod kit
While these steps are entirely possible in other software, the mod kit also includes some template files and scripts which are intended to speed up the hole creation process, and to which this guide will frequently refer.
Setting up
The first time you create a hole you'll need to take a few steps to prepare Blender for the rest of this guide. However these only need to be done once. The most obvious step, if you haven't done so already, is install Blender. It's available to download from blender.org, as well as on Steam, if you prefer. Once it is running there are a couple of useful add-ons that can be enabled, which help creating a hole. Go to `file->preferences` then select add-ons. The first is included with Blender and can be found by typing `palette` in the search box. In the results below check the box next to `Import Palettes`.
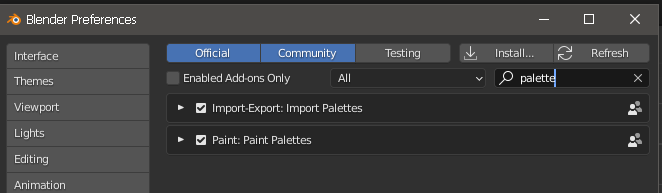
This enables importing Photoshop `.ase` palettes and Krita `.kpl` palette files into Blender. As creating a collision mask for a hole requires painting parts of the geometry specific colours then it is very convenient to be able to import palettes of these colours into your project. The palette files themselves are included as part of the mod kit, named `collision_colours.ase` and `collision_colours.kpl`.
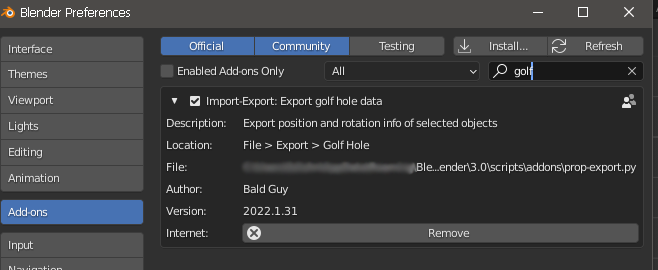
With the preferences still open click the `install` button and browse to the mod kit directory. In there is a file named `prop-export.py` which enables exporting the hole data from Blender directly to the hole configuration file used by the game. Select this to install it and enable the export option (by clicking the check box in the lower pane) in Blender. This is optional, of course, the configuration file is a text document which can be created manually (and described in full by `course_format.md` in the mod kit directory), but using this add-on can speed up creation time significantly.
If you are new to Blender then it will also be worth taking the time to learn a few basic commands. This guide is not a Blender tutorial, although there are plenty out there, such as those by Grant Abbitt on YouTube. When creating a hole it's worth knowing commands such as switching between Object and Edit mode, switching between Vertex, Edge and Face selection mode, and learning how to Grab, Rotate and Scale geometry. It maybe also be worth looking into tools like the knife tool, basic sculpting, and basic UV editing. If you feel you have a good handle on these topics, then read on!
Creating the Geometry
As stated, this guide is not meant as a Blender tutorial. It'll not cover mesh editing specifics, but rather try to explain some of the rules necessary for the creation of hole geometry. The mod kit contains a Blender file named `hole_template.blend` which has many basic properties required by the game already set up. You can open this file (in Blender 2.9 and above) then save it as a new one to prevent accidentally modifying the template. The first rule of hole geometry is never talk about hole geometry is that it should fit in an area of 320 Blender units in the X direction and 200 in the Y direction. A unit in Blender is translated to one metre in game units. When looking down from the top view 0,0 (the origin) should be in the bottom left hand corner of the model. The template file has an Image Object which is already sized and placed to these dimensions. In the Image Object properties you can select an image from your hard drive to display, which can be useful if you have 2D designs for your course. With an image loaded it is quite simple to model your geometry around your design.

When creating the geometry consider that the hole needs at least some Fairway type terrain and a Green on which to place the pin. It is also usually preferable to surround the hole in Scrub type terrain, which the game will use to mark the ball 'out of bounds' if it goes off-course. Note that the green area of the hole shouldn't be much larger than about 5-6 units in radius, else this will lead to long and tedious putts on the part of the player. In the template project there is a circular shape object named `green diameter` which can be used to gauge the size of the green area in the hole model, if you prefer.
Another helper included in the template file is a plane named `water`. This indicates the water level in the game, and should not be moved. Changing this plane will not affect the in-game water in any way, it is included in the Blender file so that you can see where the water may intersect your geometry. Modifying the size or position of the water plane will probably only cause incorrect results! If the plane appears to be in the way when modelling in Blender then it can be hidden using the layer view in the top-right window, by clicking the eye icon next to the water plane. If you do accidentally move the water plane then by default it is placed at -0.2 units on the Z axis, so moving it back to this position should fix it.
Creating the Collision Mask
VGA Golf reads collision data from the hole model by looking at the vertex colours of the mesh faces. Each terrain type has a specific colour as follows:
- RGB (05,05,05) or (0.020, 0.020, 0.020) normalised: Rough
- RGB (15,15,15) or (0.059, 0.059, 0.059) normalised: Fairway
- RGB (25,25,25) or (0.098, 0.098, 0.098) normalised: Green
- RGB (35,35,35) or (0.137, 0.137, 0.137) normalised: Bunker
- RGB (45,45,45) or (0.176, 0.176, 0.176) normalised: Water
- RGB (55,55,55) or (0.216, 0.216, 0.216) normalised: Scrub
- RGB (65,65,65) or (0.255, 0.255, 0.255) normalised: Stone
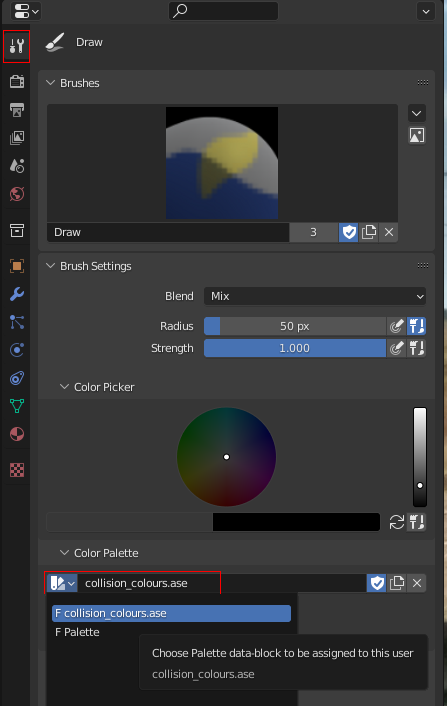
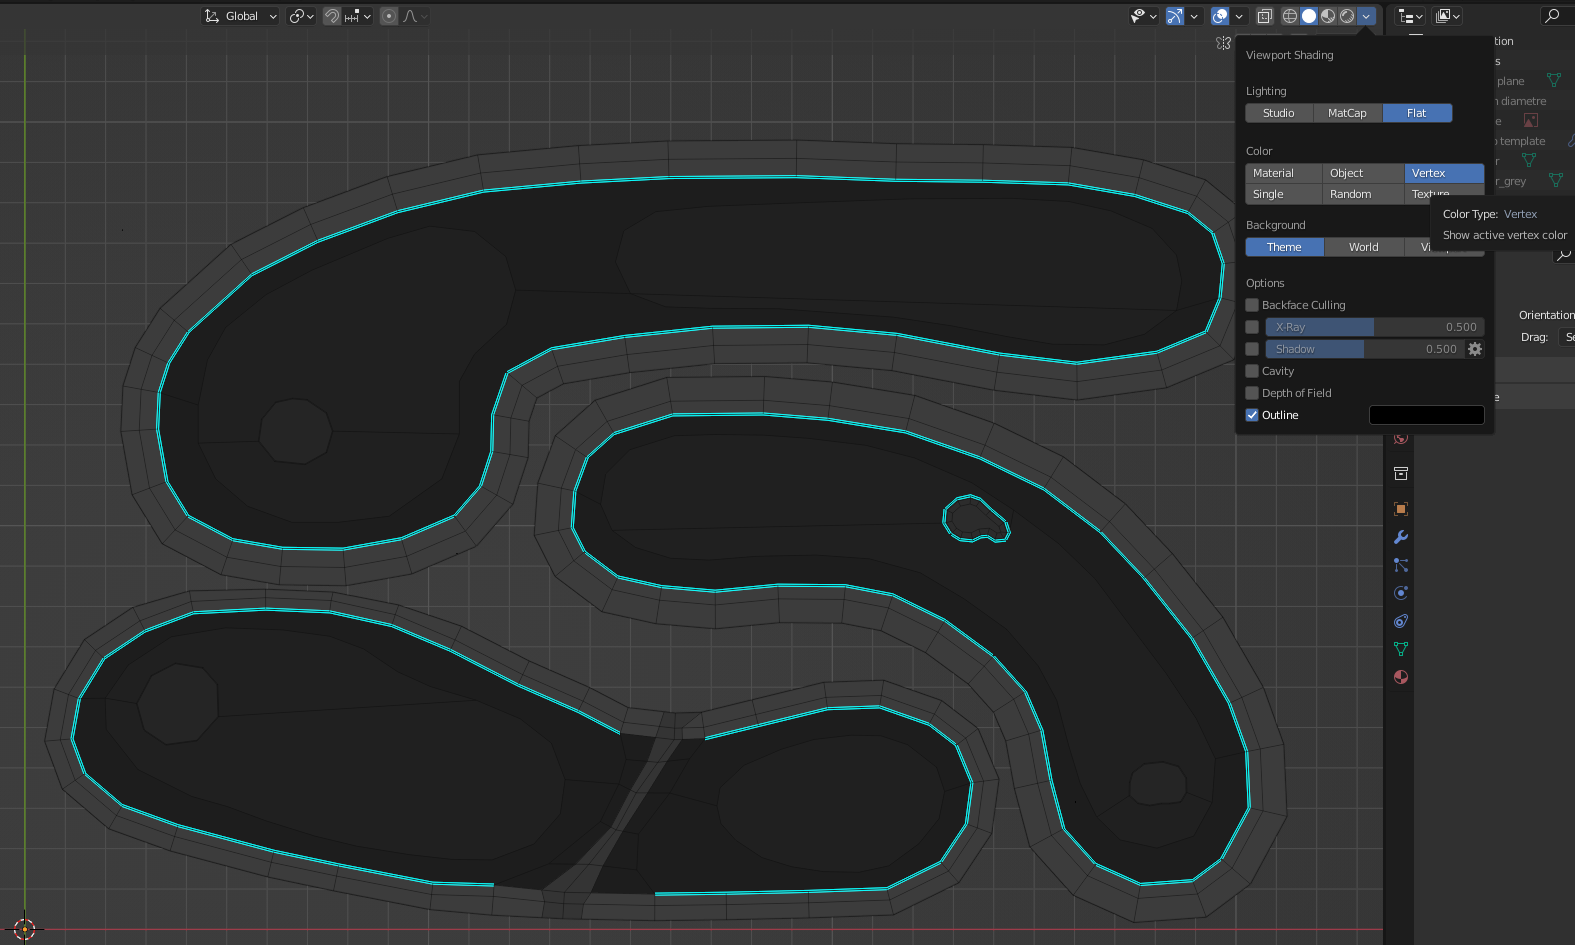
To simplify things a bit you can import a palette of these colours directly into Blender. If you don't have palette import enabled, see Setting Up (above) for how to do this. Then go to `file->import->ase` (or kpl) palette. Browse to the mod kit directory and click on the `collision_colours` palette file. Then, when in Edit mode, select the faces you want to paint, for example the faces of the Green, then switch from Edit mode to Vertex Paint mode. Rather than paint directly on the mesh, you can use the face mask button

to make sure the colour is only applied to the selected faces. On the right open the palette panel, and select the `collision colours` palette from the name drop down. Here a new swatch of grey colours should appear. Unfortunately Blender loses the name for individual colours on import, however they should be ordered as they are listed above.
Selecting the third grey square will set the active colour to that of the Green terrain collision. Press ctrl+k and the active colour will then be applied to the selected faces. Switch back to Edit mode, select the next set of faces for the next terrain (for example, the Fairway) then repeat the process. Make sure you do this for all faces in the model. If you set the material preview to flat shaded with vertex colours you will be able to see the different terrain areas:
Assigning Materials
For each terrain type on the hole geometry, VGA Golf requires a specific material. To this end the `hole_template` file includes a set of materials which are already prepared with terrain name and default textures (although they can be changed to anything you like), as well as being configured in advance for the terrain texture baking step. It's probably most practical to assign materials when in the UV Editing workspace in Blender, as it also offers instant feedback and quick iteration on an UV mapping which might be required. To assign a material select the geometry faces in the mesh edit window, click on the materials tab, highlight the appropriate material in the list then click Assign. If the viewport shading is set to Texture then the edit window will immediately update with the new material.

It is important that each terrain type has its own material assigned as the game engine uses the materials to split the mesh when it's loaded, before it then examines the vertex colour to decide which type of collision should be applied. Once materials are assigned the geometry steps for creating a hole are complete.
Exporting the Geometry
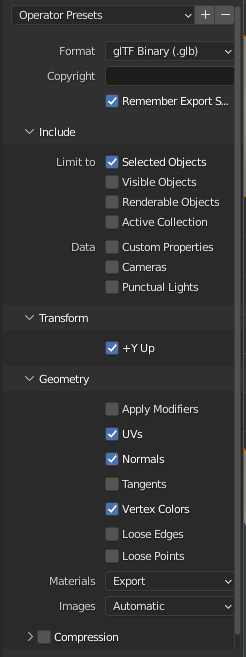
Now that the model part of the hole is created it can be exported and converted to the VGA Golf model format for use in the game. Firstly export the geometry from Blender by selecting it in Object mode, then go to `file->export->gltf` and use these settings:
With the model exported to a `*.glb` file, it can be converted to the game format using the 'Editor' application, which comes with the mod kit download on itch.io (attached to this post) or can be built from source by compiling the editor project from the repository. The first time you run the editor application some setup needs to be done to prepare it for use. However this only has to be done once. If you've already done this you can skip the next step.
Setting Up
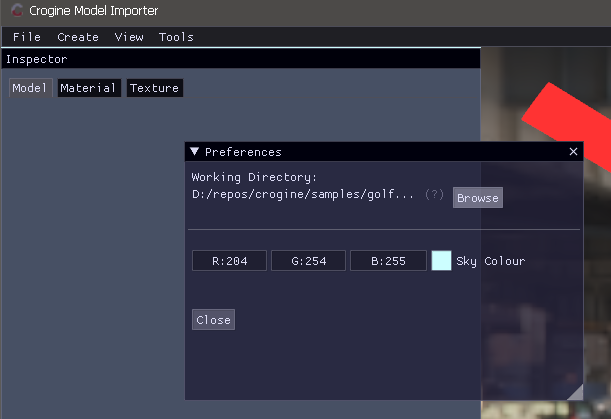
The first time the editor is run it needs to be told the working directory of VGA Golf. The working directory contains the `assets` folder, from where models and materials will be read and written. To set this go to `view->options` and then in the new window which opens select `Browse` and choose the directory where VGA Golf is installed.
Converting the Model
Open the glTF file in the Editor by going to `file->import` and select the `*.glb` file exported from Blender. A dialogue will open listing all of the models found in the glTF file - if there is more than one here make sure to export *only* the selected object from Blender, before trying to import the model again. As the model contains collision data in the vertex colours make sure that `Convert Vertex Colourspace` is checked, so that colours get converted to their correct linear values. Finally click the `Import` button.

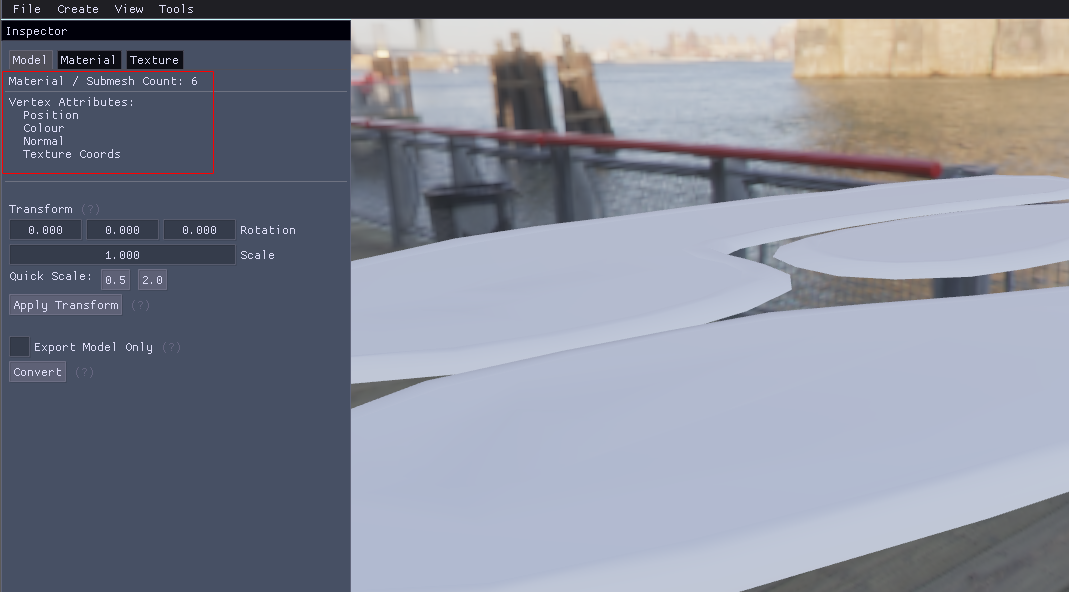
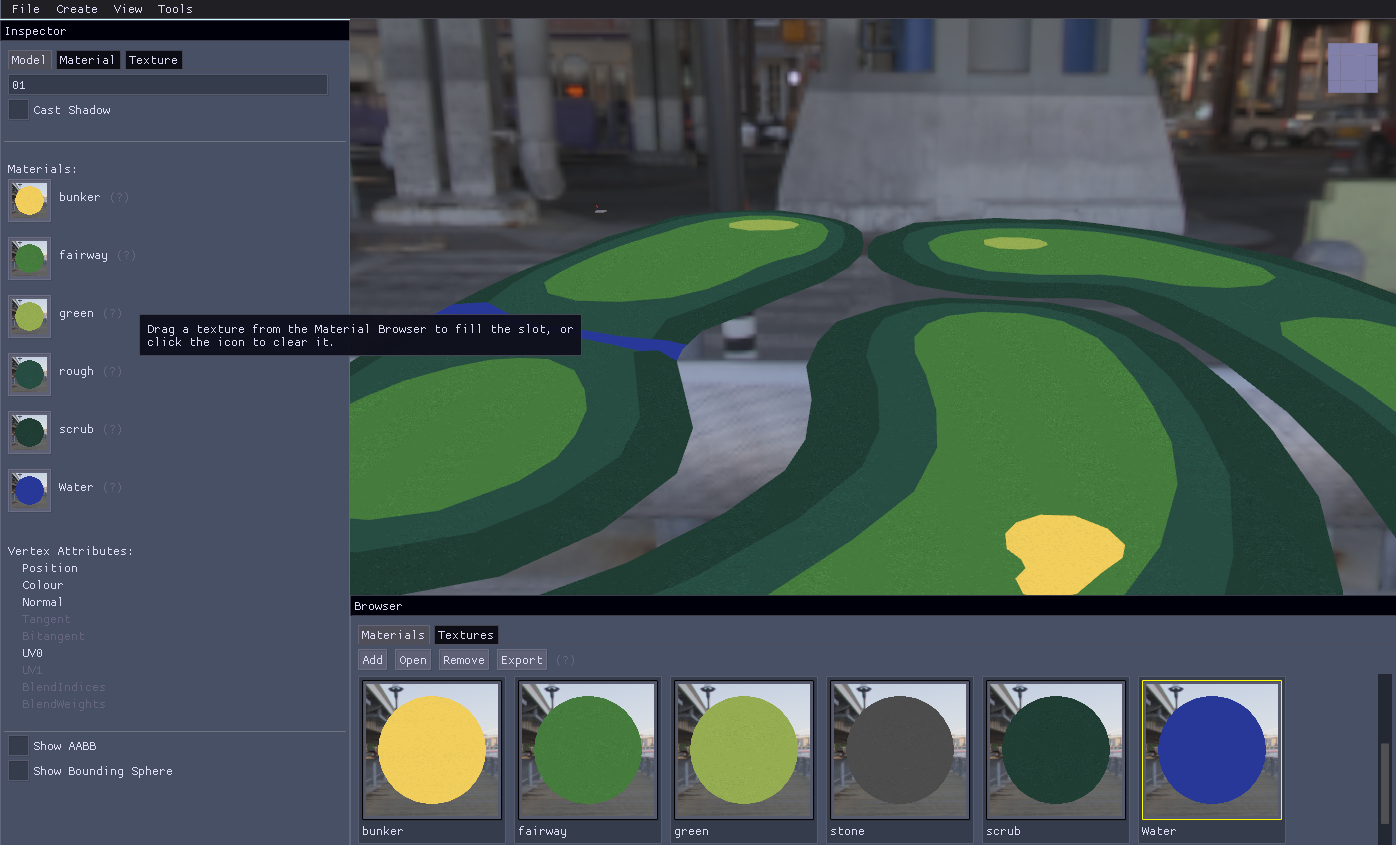
The course model will appear in the main view window with the default grey colour. As it is a very large model it may not be easy to inspect in the default camera mode. To change to a FPS style free camera click `view->use freelook`. The camera can now be moved around using the WASD, Space and Ctrl keys. Left-click dragging the view will rotate the camera.
Note that the model properties should include Colour, Normal and Texture Coords, and that there should be multiple sub-meshes listed. If there are not make sure that each terrain type correctly has its own material assigned to it in Blender, and re-export the model.
Click the convert button, then browse to the model directory inside VGA Golf's asset directory. The file path should look something like `assets/golf/models/my_golf_course/hole01.cmb`. The sub-directory and file name can be anything you like, although using the course name and hole number generally makes most sense. Make a note of this path for later, as it will be used to update the Blender file. The model will now turn a bright pink colour, as it has been converted but only default materials have been assigned. The material browser at the bottom of the window should give a preview of each of the materials available for the model. Clicking on the Materials tab in the Inspector window will display details about the currently selected material.
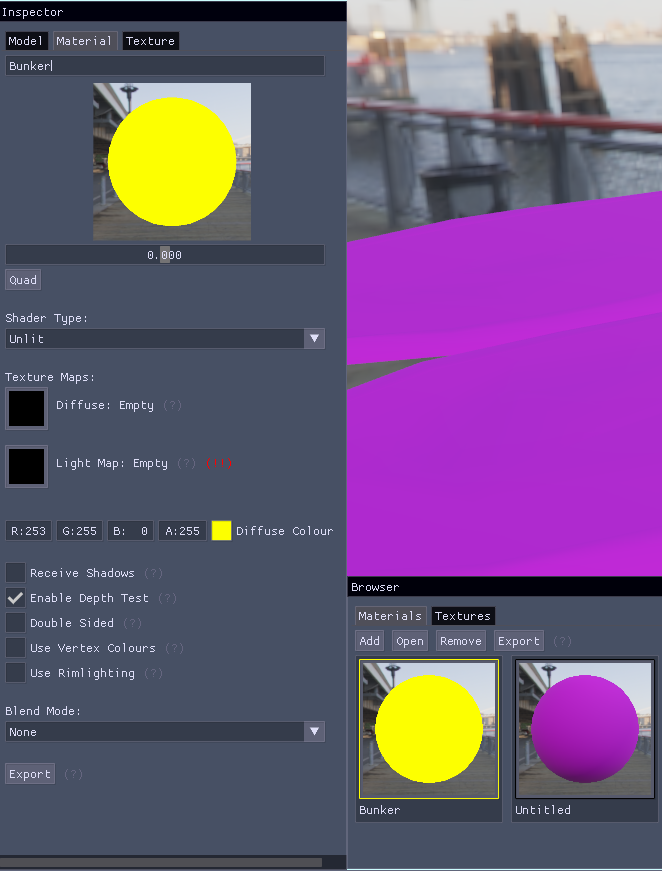
The material shader should be set to Unlit for VGA Golf. Vertex Lit shaders will work, but are ignored when the game loads. PBR materials are unsupported by VGA Golf. Click on the Textures tab in the Browser window to switch to the texture browser, then click Add to load a new texture. Texture images should be stored in the `assets/golf/images/` directory. When the texture is loaded it can be dragged into the Diffuse slot of the material in the Inspector window.

This process can be repeated for each material on the model, although as a short cut it is possible to load the materials from an existing hole model. Click the Materials tab in the Browser window then click Open. Browse to the model directory and select the `*.cmt` file for an existing hole model. Its materials are then loaded and displayed in the Browser. Each material can then be dragged to its respective slot in the Inspector window.
The file can now be saved with the new materials, and is ready for use as part of a course. As a final step update the Blender file with the path of the converted model. Blender will use this when exporting the hole data in part 2 of this guide. Click on the Scene properties tab and add a new Custom Property. Set its type to String, its name to `model_path` and the value to that of the path to the converted model:

Part two of this guide can be found here.
Leave a comment
Log in with itch.io to leave a comment.